Electro Electronics Store WooCommerce Theme Download
Electro WordPress theme is a WooCommerce WordPress theme designed and developed for use with WordPress 4.8 or higher. The code was written to be backwards compatible where possible, however we recommend you use the current WP version when possible. If you are not using WordPress 4.8 or higher and can upgrade your site we recommend you do this before installation.
Check It Out:
⇨ Electro Electronics Store WooCommerce Theme
Home Pages – Dedicated Mobile Home pages – Electro Electronics Store WooCommerce Theme
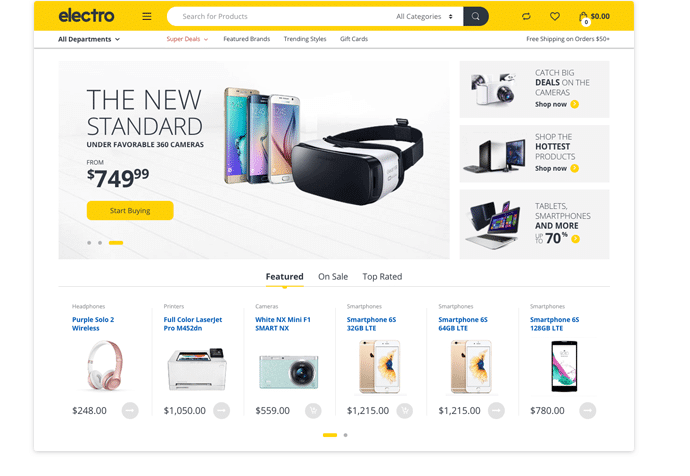
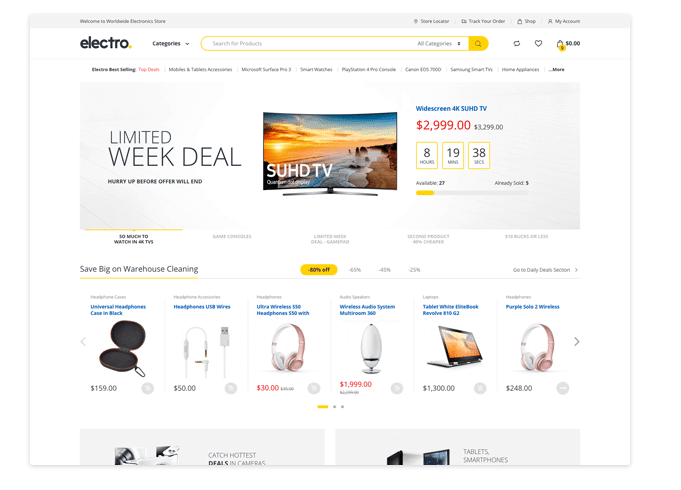
We’ve added 2 new home pages to Electro. We are calling them Home v4 and Home v5. These 2 home pages have added 10 new sections with their Visual Composer equivalent elements. Here are the screenshots of the newly added home pages :
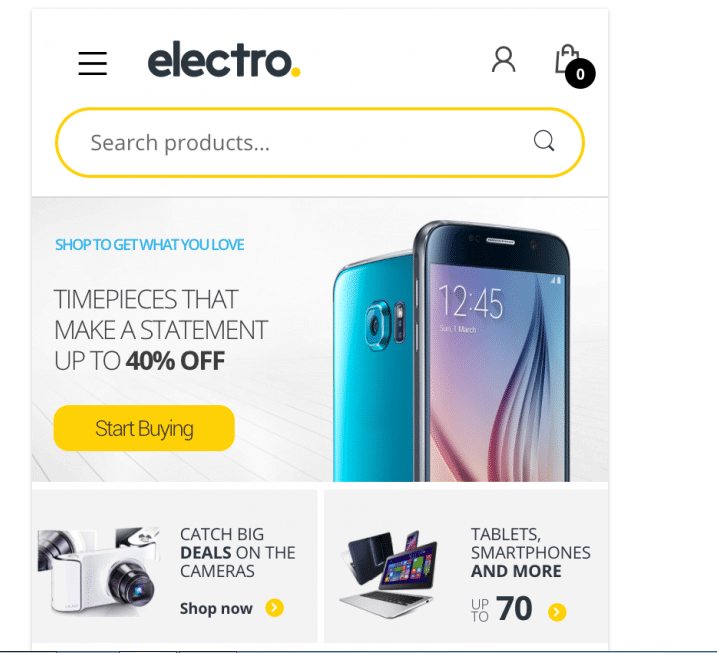
We’ve introduced 2 new pages just for mobile. These pages are meant specially for mobile. They will have a different header, footer and content. New settings in Electro theme options to control which page should load if accessed from mobile.
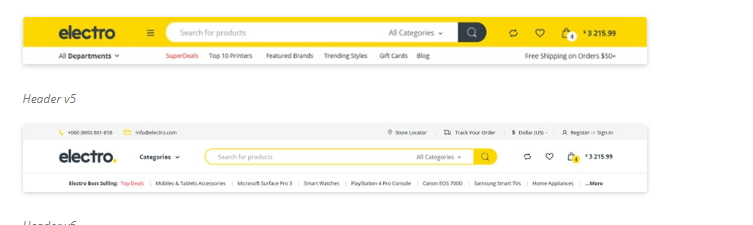
New Headers – Electro Electronics Store WooCommerce Theme Download
With 2 new home pages, we’ve also added 2 new headers.
New Menus
We now have introduced 2 menu locations.
Off Canvas Menu: Earlier an offcanvas menu was available only on mobile view. Now this menu is available on all screens
Mobile Handheld Department: Departments menu in Mobile Home v2
Off Canvas Menu
Mobile Handheld Departments Menu
Improvements
Changes to mobile layout
With inputs from our customers, we’ve completely re-written the mobile responsive view of our existing pages. Most visible changes are :
New Mobile header
Default 2-columns for products in mobile view
Improved display for Product Cards
Various structures are neatly re-arranged instead of single column
Scrollable tabs instead of vertical columns
New Footer for mobile
Home v1 in Mobile in Electro 1.4.x
Home v1 in Mobile in Electro 2.0
Migration to Flexbox
We’ve migrated from traditional CSS float for layout to Flexbox. Even though the theme loads Bootstrap 3.7.x ( for backward compatibility ), we’ve re-written most of the layouts using Bootstrap 4’s grid mixins. Flexbox allows greater flexibility and removes hacks that are used to adjust layout issues. Here are the places where we’ve re-written CSS code for layout using Flexbox :
Header Elements
Footer Widgets and Footer Bottom Widgets
The complete page layout with sidebar
Product lists and Product Cards
General Reduction in spacing
In Electro 1.x, there were lot of white spacing between sections and between elements within sections. We’ve reduced them as that is the latest trend with latest eCommerce websites. Here is a quick look at the differences :
Home v1 Spacing in Electro v1.4.x
Home v1 in Electro 2.0
30% increase in Shop Page Speed
Shop pages in Electro by default had 4 views. We have optimized the data load logic for these views. Our tests have confirmed improvement in shop page speed upto 30%.
Complete One Click Demo Import
Earlier in 1.2.x versions, we had supplied one click demo import. However after one click demo import you will have to do additional configurations and import sliders separately. With 2.0, every configuration and even slider import is taken care by just one click making it truly One Click Demo Import
Modified .php or .css via Electro child theme
This is the most common scenario. Since we’ve rewritten lot of code some of the customisations that you might have added may not apply to Electro 2.0. So it is important to identify what type of customisations you’ve made, check against the changes that have been implemented and then update the customisations accordingly.
CSS Changes
In Electro 2.0, we’ve replaced traditional layout using float with the more advanced Flexbox. We’ve also re-written Product, Header and Footer blocks with improved CSS. If you have written CSS customisations to any of these blocks. It is most likely that they may not work or break existing layout.
PHP Changes
We’ve made sure that not to remove any old functions to help in backward compatibility. We’ve re-written Header and Navigation actions but we’ve used new actions instead of old ones. This means if you had made custom changes to old actions, they may not work anymore. You need to update old actions to newer actions.
Template Changes
If you’ve overridden templates by copying them to your child theme, you should check the latest version of those templates in the parent theme and update your child theme accordingly.
Use a staging server
If you have made customisations via child theme, we recommend that you use a staging server to update the parent theme and migrated the child theme hooks and CSS to latest ones in 2.0. You should never make updates to live ( or production ) server.
How to create a stagng server
Modified core parent theme
We do not recommend modifying the core parent theme. It creates ambiguous code and makes it difficult to maintain your customisations. You should identify the files that have been changed, save the code separately and then migrate the code one-by-one via a child theme.
Common Issues
We will update this section as we come across common issues from our customers
Logo is small after update
We have fixed this issue in 2.0.1. Please update the theme from 2.0.0 to 2.0.1 to fix this.
Website is completely broken
Ads blocks visual composer elements are broken
To solve this issue please add vc-ads-block class in Visual Composer Column Settings.
Image sizes are not uniform
After updating the theme sometimes images are not uniform with different images having different heights. This is caused due to new image size improvements in WooCommerce and not the theme itself.
Please navigate to Appearance > Customize > WooCommerce > Image Sizes and make sure, you’ve chosen cropped. If it is already cropped then choose a custom crop ratio and set the crop ratio as 212:198. You can also set to a different crop ratio. However please make sure the “Publish” button is enabled and click on “Publish”.
Now the images will be regenerated in the background. Once all the images are re-generated the images in product pages should appear uniform.
Manual Download & Installation
After purchase
Themeforest Downloads Page
Direct Download & Installation
Electro Electronics Store WooCommerce Theme
After you’ve purchased your Electro theme from ThemeForest, you can install the theme by downloading it directly into your website from Envato instead of downloading it into your computer and then uploading it via your WordPress admin dashboard. This article will guide you through the steps to do just that.
Step 1 : Envato Market Plugin
Envato Market Plugin Download
Step 2 : Installing & Configuring Envato Market
After downloading the plugin from the link above, you need to install the plugin from Plugins > Add New > Upload Plugin. Once uploaded, activate the plugin and you will now have a Envato Market page that looks like this :
Envato Market Page in WP Admin Dashboard
Step 3 : Generate Personal Token
In the Envato Market plugin page, you will have to click on “generate a personal token” link. This will take you twebsite to generate the token. You will have to give it a name ( it is arbitrary ) and the permissions for this token. It is important to keep the “View and search Envato sites”, “Download your purchased Items”, “List purchases you’ve made”, “Verify purchases you’ve made” permission checked. It looks likes this :
Generate Token Page
Once you’ve clicked on “Create Token”, it generates a token for you. You should copy it and paste it within the “Token” field in the Envato Market plugin page.
Step 4 : Install the theme
Once you’ve “Save Changes”, you should now see all your wordpress themes and plugins listed. Here is a sample screenshot :
Install Theme – Envato Market
You can now simply click on the “Install” button to install the theme.
Step 5 : Installing Child Theme
electro-child.zip file is the child theme file and can be found inside the theme-files folder within unzipped download package. We highly recommend the use of child themes. The additional step involves repeating steps 1 to 7 for electro-child.zip
Step 6 : Installing Plugins
After you have activated your theme, you’ll see a notice about required plugins for Electro, to proceed click “Begin installing plugins”.
On clicking on it, you will be redirected to Install Required Plugins Page. Alternatively this page can be accessed from Appearance > Install Plugins as well.
You will now see a list of plugins required and recommended for use with this theme. Click on the Select All checkbox to select plugins.
Click on Bulk Actions dropdown menu, choose Install dropdown option and click the Applybutton.
If all plugins are installed successfully, you will be redirected to WP Plugins page.
In case you encounter any problems, try installing theme one by one.
After you have installed all the plugins, activate them by navigating to Plugins page, select the required plugins, choose activate from the dropdown option and click on Apply button.
Setup Pages
Visual Composer Setup
Visual Composer is a premium drag drop plugin that comes bundled with the theme. It provides 40+ elements that can be easily added to your page. In addition to extending functionalities of existing elements, Electro theme has added 12 additional elements. With this set of elements, you will be able to create unlimited varities of pages.
Pages and Static Content of Electro is built using Visual Composer. Before creating Static Blocks, make sure static_block is enabled in WPBakery Page Builder > Role manager.
Assign Home & Blog Page
Electro comes with 5 different types of Home Pages. By default the home pages are built using Page templates. However it is also possible to build the home pages entirely with King Composer or Visual Composer. Please follow the steps below to assign one of the 5 home pages as your website’s home page.
Navigate to Pages in your WordPress admin menu to make sure all pages have been imported.
Navigate to Settings > Reading.
For the Front page displays setting, choose A static page ( select below ) option.
For Front Page, choose any one of the 5 home pages that was imported.
For Posts Page, choose Blog page as your posts page.
Navigation
Setup WooCommerce
Assign WooCommerce Pages
WooCommerce Pages are Shop, Cart, Checkout, Terms & Conditionsand My Account pages. These pages are imported through the import process. Now we need to assign them to let WooCommerce plugin know about them. To do that :
Shop : Navigate to WooCommerce > Settings > Products > General > Shop Page and choose Shop pagefrom the dropdown.
Cart, Checkout and Terms & Conditions : Navigate to WooCommerce > Settings > Checkout and choose Cart, Checkout and Terms & Conditions pages from the dropdown.
My Account : Navigate to WooCommerce > Settings > Account > My Account Page and choose My Account page from the dropdown
Home v1 Mobile via Visual Composer
Home v1 Mobile of Electro is built using Visual Composer.It has 12 elements. The Visual Composer Backend editor of the page look like this
Home v1 Mobile VC Code
Please switch your editor to classic mode and paste the code given here :
After pasting the code, you can simply switch to Backend Editor to view the screen just like in the screenshot above. We have documented this step here :
The Details
Slider
Output
Setting
Revolution Slider – Choose slider for your homepage – Default: Home-v1-slider
Ads Block
Output
Setting
This row has two columns in the ratio 1/2 + 1/2
Both the columns have Ads block
Ads Block setting
Image – Upload image for ads block
Caption Text – Enter the ads block text – Default: Catch Big Deals on the Cameras
Action Text – Enter the ads block button text – Default: Shop now
Action Link – Enter the URL for the ads block button – Default: #
Product Categories List
Output
Settings
Enter Columns – Enter the number of columns to display. – Deafult: 4
Number of Categories to display – Enter number of categories to be displayed – Default: 8
Have no products – Enable/disable categories does not have products
Orderby – Field name by which the categories should be ordered – Default: date
Order – Enter the order of the product to be displayed either in Ascending or Descending Order – Deafult: ASC
Include ID’s – Enter the product ids
Include slug’s – Enter categories to be displayed
Enter class name – Enter extra class name for this block
Deals Products Block
Output
Settings
Enter title – Enter title – Default: Deals of the Day
Shortcode – Choose product shortcode
Orderby – Field name by which the categories should be ordered – Default: date
Order – Enter the order of the product to be displayed either in Ascending or Descending Order – Deafult: ASC
Limit – Enter the number of products to display. – Default: 2
Columns – Enter the number of columns to display. – Deafult: 2
Action Text – Enter the ads block button text – Default: See all Deals
Action Link – Enter the URL for the ads block button – Default: #
Single Image
Output
Setting
Widget title – Enter title of the image
Image source – Select image source – Default: Media library
Image – Upload image
Image size – Enter image size – Default: full
Add caption? – Add image caption.
Image alignment – Select image alignment.
Image style – Select image display style.
On click action – Select action for click action.
Products 1-2 Block
Output
Settings
Enter title – Enter title – Default: Featured Products
Shortcode – Choose product shortcode
Orderby – Field name by which the categories should be ordered – Default: date
Order – Enter the order of the product to be displayed either in Ascending or Descending Order – Deafult: ASC
Action Text – Enter the ads block button text – Default: See all products
Action Link – Enter the URL for the ads block button – Default: #
Product Categories List with Header Image
Output
Settings
Enter title – Enter title – Default: Laptops & Computers
Enter subtitle – Enter subtitle – Default: Featured Subcategories
Background Image – Upload image
Enable Header – Enable/disable header for this block
Enter Columns – Enter the number of columns to display. – Deafult: 3
Number of Categories to display – Enter number of categories to be displayed – Default: 9
Have no products – Enable/disable categories does not have products
Orderby – Field name by which the categories should be ordered – Default: date
Order – Enter the order of the product to be displayed either in Ascending or Descending Order – Deafult: ASC
Include ID’s – Enter the product ids
Include slug’s – Enter categories to be displayed
Header Version – Choose the header style – Default: Type 1
Enter class name – Enter extra class name for this block
Electro Products List Block
Electro Electronics Store WooCommerce Theme
Output
Settings
Enter title – Enter title – Default: Bestsellers
Type– Choose type – Default: v2
Action Text – Enter the action text – Default: See all Deals
Action Link – Enter the action text URL – Default: #
Shortcode – Choose product shortcode – Default: Recent Products
Orderby – Field name by which the categories should be ordered – Default: date
Order – Enter the order of the product to be displayed either in Ascending or Descending Order – Deafult: ASC
Limit – Enter the number of products to be displayed. – Default: 6
Enable Header Categories – Enable/disable categories on header block.
Enter categories title – Enter category title – Default: Top 20
Number of Categories to display – Enter number of categories to be displayed – Default: 3
Have no products – Enable/disable categories does not have products
Orderby – Field name by which the categories should be ordered – Default: date
Order – Enter the order of the product to be displayed either in Ascending or Descending Order – Deafult: ASC
Include ID’s – Enter the product ids
Include slug’s – Enter categories to be displayed
Single Image
Output
Setting
Widget title – Enter title of the image
Image source – Select image source – Default: Media library
Image – Upload image
Image size – Enter image size – Default: full
Add caption? – Add image caption.
Image alignment – Select image alignment.
Image style – Select image display style.
On click action – Select action for click action.
Electro Products List Block
Output
Settings
Enter title – Enter title – Default: Smartphones
Type– Choose type – Default: v2
Action Text – Enter the action text – Default: See all Deals
Action Link – Enter the action text URL – Default: #
Shortcode – Choose product shortcode – Default: Recent Products
Orderby – Field name by which the categories should be ordered – Default: date
Order – Enter the order of the product to be displayed either in Ascending or Descending Order – Deafult: ASC
Limit – Enter the number of products to be displayed. – Default: 6
Enable Header Categories – Enable/disable categories on header block.
Enter categories title – Enter category title – Default: Top 20
Number of Categories to display – Enter number of categories to be displayed – Default: 3
Have no products – Enable/disable categories does not have products
Orderby – Field name by which the categories should be ordered – Default: date
Order – Enter the order of the product to be displayed either in Ascending or Descending Order – Deafult: ASC
Include ID’s – Enter the product ids
Include slug’s – Enter categories to be displayed
Product Categories Block
Output
Setting
Enter title – Enter title – Default: Top Categories this Week
Enter Columns– Enter number of product columns to be displayed – Default: 4
Number of Categories to display – Enter the number of categories to be displayed – Default: 6
Have no products – Enable/disable categories does not have products
Orderby – Field name by which the categories should be ordered – Default: date
Order – Enter the order of the product to be displayed either in Ascending or Descending Order – Deafult: ASC
Include slug’s – Enter category to be displayed in this block
Include ID’s – Enter catgeory to be displayed by IDs
Enter class name – Enter extra class name for this block